10 Easy Steps to Master the Art of Tying a Bowtie
Mastering the Art of Tying a Bowtie
Perfecting the skill of tying a bowtie is an essential aspect of every gentleman’s wardrobe. A well-tied bowtie exudes confidence, sophistication, and style, making it a timeless accessory for various occasions. Tie One On offers an extensive collection of high-quality bow ties and accessories, ensuring that you can find the perfect match for your personal style and event needs.
Before You Begin
Before you start mastering the art of tying a bowtie, it’s important to consider the occasion and style you’re aiming for. Choosing the right bowtie is crucial, as it can greatly impact your overall look and confidence. Tie One On offers a wide variety of bow ties to suit any event and style preference.
Once you’ve selected the perfect bowtie, ensure it fits comfortably by taking proper measurements. A well-fitted bowtie should sit snugly around your neck without causing any discomfort or feeling too tight. It’s essential to get the fit right in order to achieve a polished and professional appearance.
Finally, practice makes perfect when it comes to tying a bowtie. Using a high-quality bowtie from Tie One On will not only help you refine your skills but also ensure you’re learning with a top-notch product. Remember, the more you practice, the more confident and proficient you’ll become in tying a bowtie.
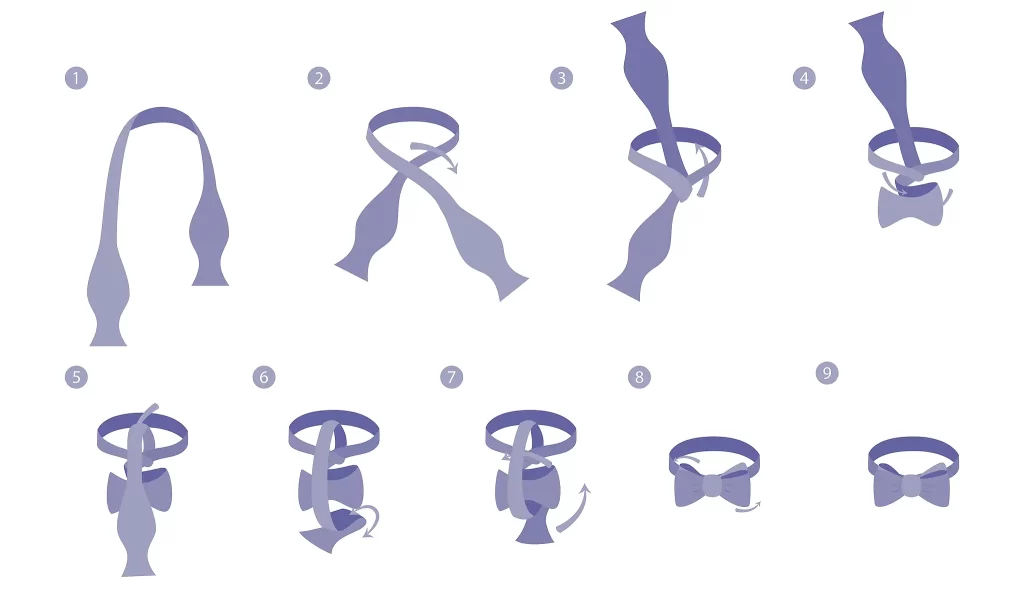
Step 1: Drape the Bowtie Around Your Neck
To begin mastering the art of tying a bowtie, start by draping the bowtie around your neck. Position the bowtie in a way that one end is slightly longer than the other. This will help ensure a proper fit and make tying the bowtie much easier. It is essential to make sure the longer end of the bowtie is on your dominant side, as this will allow for easier tying and better control over the knot formation. By following these initial steps, you’ll be well on your way to becoming a bowtie-tying pro.
Step 2: Cross the Bowtie Ends
Now that the bowtie is draped around your neck with one end slightly longer than the other, it’s time to cross the ends. Bring the longer end over the shorter end, ensuring that the longer end remains on your dominant side. This will make it easier to tie the bowtie as you progress through the steps.
As you cross the ends, create a snug but comfortable loop around your neck. It’s essential to find the right balance between tightness and comfort, as this will affect the final appearance and feel of the bowtie. A well-tied bowtie should be secure enough to stay in place without causing any discomfort.
Step 3: Form the First Bow Loop
At this stage, it’s time to create the initial bow shape of your bowtie. To do this, fold the shorter end into a bow shape, making sure the widest part of the fabric forms the front loop. Once you’ve shaped the first loop, use your non-dominant hand to hold the bow in place. This will help maintain the structure as you continue with the next steps in the process.
Step 4: Bring the Longer End Over the Bow
Once you have formed the first bow loop, it’s time to incorporate the longer end of the bowtie. Position the longer end directly over the center of the bow, ensuring it is aligned properly. This step is crucial for creating a symmetrical and well-formed bowtie knot. After positioning the longer end, it is essential to keep it out of the way for the next step. This will allow you to smoothly transition into creating the second bow loop without any interference. Remember to maintain a professional and concise approach throughout the process, as this will help you master the art of tying a bowtie more effectively.
Step 7: Create the Second Bow Loop
To continue mastering the art of tying a bowtie, it’s time to create the second bow loop. With the longer end of the bowtie, fold it into a bow shape similar to the first loop. This will help ensure a symmetrical and professional appearance for your bowtie.
Once you’ve formed the second bow loop, carefully position it behind the first loop. This may require a bit of finesse and practice, but it’s a crucial step in achieving a secure and well-tied bowtie. As you become more adept at tying a bowtie, you’ll find that this process becomes smoother and more natural.
Remember, practice makes perfect, and Tie One On offers a wide variety of bowties and accessories to help you refine your skills and achieve a polished look. With a professional and concise approach, you’ll soon master the art of tying a bowtie.
Step 6: Insert the Second Loop Through the Back Loop
Once you have created both bow loops, it’s time to secure the knot. Gently pull back the first loop to reveal a small hole behind it. This hole is the key to connecting the two loops and forming a secure bowtie knot.
With care, push the second loop through the hole you’ve revealed. As you do this, ensure both loops are even and symmetrically aligned. This step may require some patience and practice, but mastering it is essential to achieving a polished and professional bowtie appearance.
Step 7: Tighten and Adjust the Bowtie
Once you have successfully created both loops and passed the second loop through the hole, it’s time to perfect your bowtie. Start by gently pulling on both loops simultaneously to tighten the knot. Ensure that you maintain a balance between a snug fit and comfort around your neck.
After tightening the knot, it’s essential to adjust the bowtie for a symmetrical and secure fit. Carefully examine the bowtie in the mirror, making minor adjustments to achieve an even and polished look. Remember that practice is key, and with time, you will master the art of tying a perfect bowtie that showcases your professional and straightforward style.
Step 8: Complete Your Look with Tie One On Accessories
Now that you’ve mastered the art of tying a bowtie, it’s time to enhance your style with additional accessories from Tie One On. These items not only complement your bowtie but also elevate your overall appearance for any occasion. Start by pairing your bowtie with a matching pocket square or cufflinks to create a cohesive and polished look.
Another accessory to consider is a tie bar, which can be both functional and fashionable. By using a tie bar, you can secure your bowtie in place and prevent it from shifting throughout the day. Moreover, a tie bar adds a stylish touch to your ensemble, showcasing your attention to detail and fashion sense. Explore Tie One On’s range of accessories to find the perfect additions to your refined bowtie look.
Tips for Mastering the Art of Tying a Bowtie
Mastering the art of tying a bowtie requires practice and patience. To help you become more comfortable and efficient in tying a bowtie, here are a few tips to keep in mind:
Practice before attending an event: Give yourself ample time to practice tying a bowtie before you need to wear one to an event. This will help you feel more confident and ensure that you can tie it properly when the time comes.
Use a mirror for guidance and better visualization: Stand in front of a mirror while tying your bowtie to get a clear view of your progress. This can help you see what you’re doing and make any necessary adjustments as you go.
Experiment with different bowtie styles and materials: Bowties come in various styles, colors, and materials, so it’s essential to find one that suits your personal style and the occasion. By experimenting with different options, you can discover what works best for you and become more adept at tying various types of bowties.
Incorporating these tips into your practice routine will help you master the art of tying a bowtie. Remember, the key is to be patient and practice regularly. With time and dedication, you will soon be able to tie a bowtie with ease and confidence.
Master Your Bowtie Game
With practice and patience, you can refine your bowtie-tying skills and achieve a polished, sophisticated look for any occasion. Remember, the key is to select a high-quality bowtie that suits your style and the event, and to continually practice your technique. Tie One On offers a diverse selection of bowties and accessories to help you perfect your skills and complete your ensemble. Explore their collection and find the perfect bowtie for your needs today at https://www.shoptieoneon.com .


Leave a Reply
Want to join the discussion?Feel free to contribute!